There are certainly a lot of guides to assist you build great deep learning (DL) setups on Linux or Mac OS (including with Tensorflow which, unfortunately, as of this posting, cannot be easily installed on Windows), but few care about building an efficient Windows 10-native setup. Most focus on running an Ubuntu VM hosted on Windows or using Docker, unnecessary - and ultimately sub-optimal - steps.
We also found enough misguiding/deprecated information out there to make it worthwhile putting together a step-by-step guide for the latest stable versions of Theano and Keras. Used together, they make for one of the simplest and fastest DL configurations to work natively on Windows.
So, if you must run your DL setup on Windows 10, then the information contained here may be useful to you.
Dependencies
Here's a list of the tools and libraries we use for deep learning on Windows 10:1. Visual Studio 2013 Community Edition Update 4
- Used for its C/C++ compiler (not its IDE)
2. CUDA 7.5.18 (64-bit)
- Used for its GPU math libraries, card driver, and CUDA compiler
3. MinGW-w64 (5.3.0)
- Used for its Unix-like compiler and build tools (g++/gcc, make...) for Windows
4. Anaconda (64-bit) w. Python 2.7 (Anaconda2-4.1.0)
- A Python distro that gives us NumPy, SciPy, and other scientific libraries
5. Theano 0.8.2
- Used to evaluate mathematical expressions on multi-dimensional arrays
6. Keras 1.0.5
- Used for deep learning on top of Theano
7. OpenBLAS 0.2.14 (Optional)
- Used for its CPU-optimized implementation of many linear algebra operations
8. cuDNN v5 (Conditional)
- Used to run vastly faster convolution neural networks
Hardware
This is our hardware config:1. Dell Precision T7500, 96GB RAM
- Intel Xeon E5605 @ 2.13 GHz (2 processors, 8 cores total)
2. NVIDIA GeForce Titan X, 12GB RAM
- Driver version: 10.18.13.5390 Beta (ForceWare 353.90) / Win 10 64
Installation steps
We like to keep our toolkits and libraries in a single root folder boringly called c:\toolkits, so whenever you see a Windows path that starts with c:\toolkits below, make sure to replace it with whatever you decide your own toolkit drive and folder ought to be.Visual Studio 2013 Community Edition Update 4
You can download Visual Studio 2013 Community Edition from here. Yes, we're aware there's a Visual Studio 2015 Community Edition, and it is also installed on our system, BUT the CUDA toolkit won't even attempt to use it, as shown below: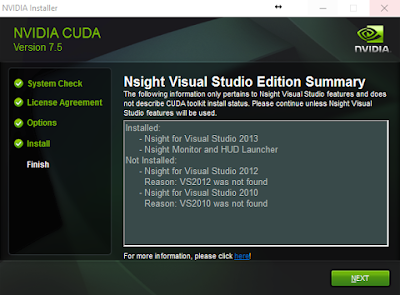
So make sure to install VS 2013, if you haven't already. Then, add C:\Program Files (x86)\Microsoft Visual Studio 12.0\VC\bin to your PATH, based on where you installed VS 2013.
CUDA 7.5.18 (64-bit)
Download CUDA 7.5 (64-bit) from the NVidia website.Select the proper target platform:

Download the installer:

Run the installer. In our case (a fluke?) the installer didn't allow us to choose where to install its files. It installed in C:\Program Files\NVIDIA GPU Computing Toolkit\CUDA\v7.5. Once it has done so, move the files from there to c:\toolkits\cuda-7.5.18 and update PATH as follows:
1. Define a system environment (sysenv) variable named CUDA_HOME with the value c:\toolkits\cuda-7.5.18
2. Add %CUDA_HOME%\libnwp and %CUDA_HOME%\bin to PATH
MinGW-w64 (5.3.0)
Download MinGW-w64 from here:
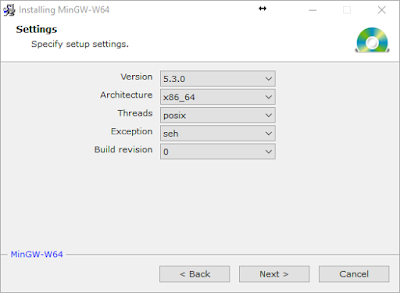
Install it to c:\toolkits\mingw-w64-5.3.0 with the following settings (second wizard screen):
1. Define sysenv variable MINGW_HOME with the value c:\toolkits\mingw-w64-5.3.0
2. Add %MINGW_HOME%\mingw64\bin to PATH
Run the following to make sure all necessary build tools can be found:
$ where gcc; where cl; where nvcc; where cudafe; where cudafe++
You should get results similar to:

Anaconda (64-bit) w. Python 2.7 (Anaconda2-4.1.0)
Download Anaconda from here and install it to `c:\toolkits\anaconda2-4.1.0`: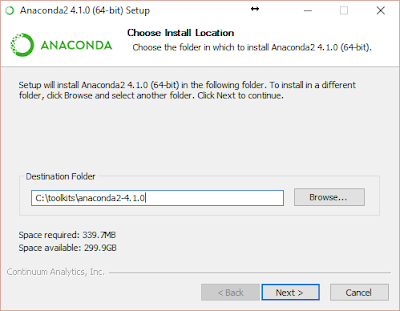
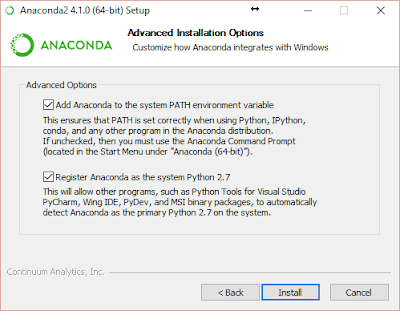
Warning: Below, we enabled `Register Anaconda as the system Python 2.7` because it works for us, but that may not be the best option for you!
1. Define sysenv variable PYTHON_HOME with the value c:\toolkits\anaconda2-4.1.0
2. Add %PYTHON_HOME%, %PYTHON_HOME%\Scripts, and %PYTHON_HOME%\Library\bin to PATH
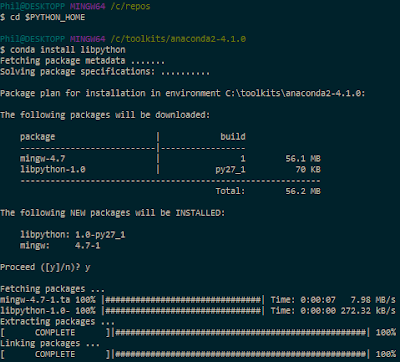
After anaconda installation open a MINGW64 command prompt and execute:
$ cd $PYTHON_HOME
$ conda install libpython
Theano 0.8.2
Version 0.8.2? Why not just install the latest bleeding-edge version of Theano since it obviously must work better, right? Simply put, because it makes reproducible research harder. If your work colleagues or Kaggle teammates install the latest code from the dev branch at a different time than you did, you will most likely be running different code bases on your machines, increasing the odds that even though you're using the same input data (the same random seeds, etc.), you still end up with different results when you shouldn't. For this reason alone, we highly recommend only using point releases, the same one across machines, and always documenting which one you use if you can't just use a setup script.Clone a stable Theano release (0.8.2) to your local machine from GitHub using the following commands:
$ cd /c/toolkits
$ git clone https://github.com/Theano/Theano.git theano-0.8.2 --branch rel-0.8.2
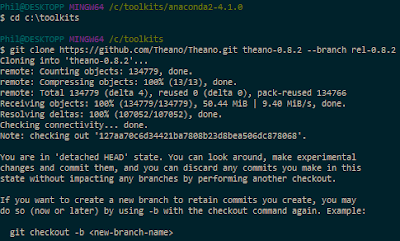
This should clone Theano 0.8.2 in c:\toolkits\theano-0.8.2:
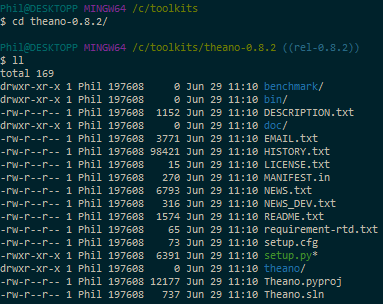
Install it as follows:
$ cd /c/toolkits/theano-0.8.2
$ python setup.py install --record installed_files.txt
The list of files installed can be found here
Verify Theano was installed by querying Anaconda for the list of installed packages:
$ conda list | grep -i theano
OpenBLAS 0.2.14 (Optional)
If we're going to use the GPU, why install a CPU-optimized linear algebra library? With our setup, most of the deep learning grunt work is performed by the GPU, that is correct, but the CPU isn't idle. An important part of image-based DL is data augmentation. In that context, data augmentation is the process of manufacturing additional input samples (more training images) by transformation of the original training samples, via the use of image processing operators. Basic transformations such as downsampling and (mean-centered) normalization are also needed. If you feel adventurous, you'll want to try additional pre-processing enhancements (noise removal, histogram equalization, etc.). You certainly could use the GPU for that purpose and save the results to file. In practice, however, those operations are often executed in parallel on the CPU while the GPU is busy learning the weights of the deep neural network and the augmented data discarded after use. For this reason, we highly recommend installing the OpenBLAS library.According to the Theano documentation, the multi-threaded OpenBLAS library performs much better than the un-optimized standard BLAS (Basic Linear Algebra Subprograms) library, so that's what we use.
Download OpenBLAS from here and extract the files to c:\toolkits\openblas-0.2.14-int32
1. Define sysenv variable OPENBLAS_HOME with the value c:\toolkits\openblas-0.2.14-int32
2. Add %OPENBLAS_HOME%\bin to PATH
Switching between CPU and GPU mode
Next, create the two following sysenv variables:- sysenv variable THEANO_FLAGS_CPU with the value floatX=float32,device=cpu,lib.cnmem=0.8,blas.ldflags=-LC:/toolkits/openblas-0.2.14-int32/bin -lopenblas
- sysenv variable THEANO_FLAGS_GPU with the value floatX=float32,device=gpu,dnn.enabled=False,lib.cnmem=0.8,blas.ldflags=-LC:/toolkits/openblas-0.2.14-int32/bin -lopenblas
Theano only cares about the value of the sysenv variable named THEANO_FLAGS. All we need to do to tell Theano to use the CPU or GPU is to set THEANO_FLAGS to either THEANO_FLAGS_CPU or THEANO_FLAGS_GPU. You can verify those variables have been successfully added to your environment with the following command:
$ env | grep -i theano

Note: See the cuDNN section below for information about the THEANO_FLAGS_GPU_DNN flag
Validating our OpenBLAS install (Optional)
We can use the following program from the Theano documentation:import numpy as np import time import theano print('blas.ldflags=', theano.config.blas.ldflags) A = np.random.rand(1000, 10000).astype(theano.config.floatX) B = np.random.rand(10000, 1000).astype(theano.config.floatX) np_start = time.time() AB = A.dot(B) np_end = time.time() X, Y = theano.tensor.matrices('XY') mf = theano.function([X, Y], X.dot(Y)) t_start = time.time() tAB = mf(A, B) t_end = time.time() print("numpy time: %f[s], theano time: %f[s] (times should be close when run on CPU!)" % ( np_end - np_start, t_end - t_start)) print("Result difference: %f" % (np.abs(AB - tAB).max(), ))
Save the code above to a file named openblas_test.py in the current directory (or download it from this GitHub repo and run the next commands:
$ THEANO_FLAGS=$THEANO_FLAGS_CPU
$ python openblas_test.py

Note: If you get a failure of the kind "NameError: global name 'CVM' is not defined", it may be because, like us, you've messed with the value of THEANO_FLAGS_CPU and switched back and forth between floatX=float32 and floatX=float64 several times. Cleaning your C:\Users\username\AppData\Local\Theano directory (replace username with your login name) will fix the problem (See here, for reference)
Validating our GPU install with Theano
We'll run the following program from the Theano documentation to compare the performance of the GPU install vs using Thenao in CPU-mode. Save the code to a file named cpu_gpu_test.py in the current directory (or download it from this GitHub repo):from theano import function, config, shared, sandbox import theano.tensor as T import numpy import time vlen = 10 * 30 * 768 # 10 x #cores x # threads per core iters = 1000 rng = numpy.random.RandomState(22) x = shared(numpy.asarray(rng.rand(vlen), config.floatX)) f = function([], T.exp(x)) print(f.maker.fgraph.toposort()) t0 = time.time() for i in range(iters): r = f() t1 = time.time() print("Looping %d times took %f seconds" % (iters, t1 - t0)) print("Result is %s" % (r,)) if numpy.any([isinstance(x.op, T.Elemwise) for x in f.maker.fgraph.toposort()]): print('Used the cpu') else: print('Used the gpu')
First, let's see what kind of results we get running Theano in CPU mode:
$ THEANO_FLAGS=$THEANO_FLAGS_CPU
$ python cpu_gpu_test.py

Next, let's run the same program on the GPU:
$ THEANO_FLAGS=$THEANO_FLAGS_GPU
$ python cpu_gpu_test.py

Almost a 26:1 improvement. It works! Great, we're done with setting up Theano 0.8.2.
Keras 1.0.5
Clone a stable Keras release (1.0.5) to your local machine from GitHub using the following commands:$ cd /c/toolkits
$ git clone https://github.com/fchollet/keras.git keras-1.0.5 --branch 1.0.5
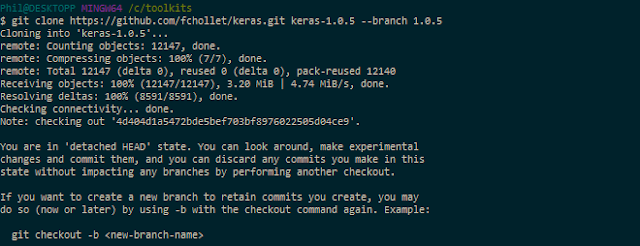
This should clone Keras 1.0.5 in c:\toolkits\keras-1.0.5:
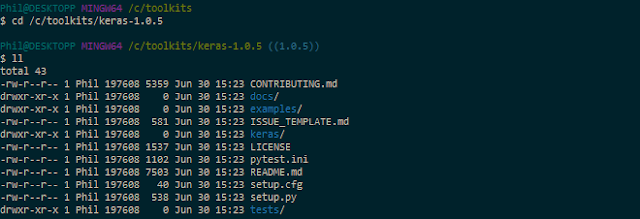
Install it as follows:
$ cd /c/toolkits/keras-1.0.5
$ python setup.py install --record installed_files.txt
The list of files installed can be found here
Verify Keras was installed by querying Anaconda for the list of installed packages:
$ conda list | grep -i keras
Validating our GPU install with Keras
We can train a simple convnet (convolutional neural network) on the MNIST dataset by using one of the example scripts provided with Keras. The file is called mnist_cnn.py and can be found in the examples folder:$ cd /c/toolkits/keras-1.0.5/examples
$ python mnist_cnn.py
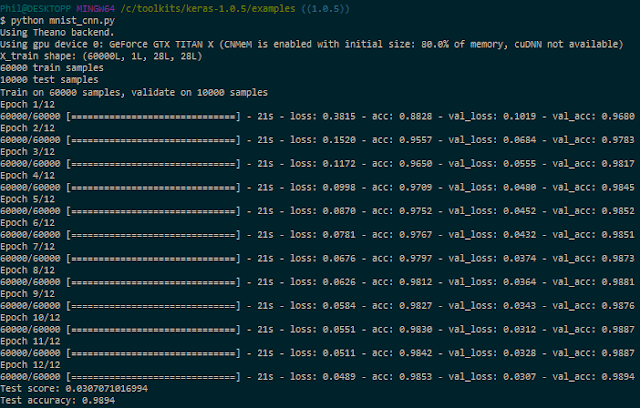
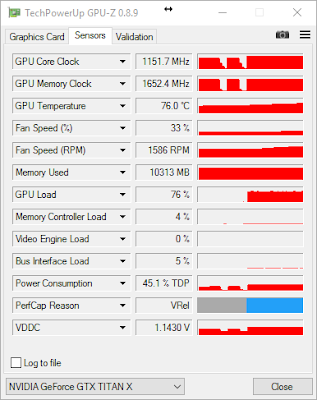
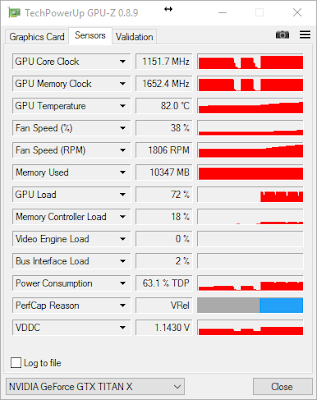
Without cuDNN, each epoch takes about 21s. If you install TechPowerUp's GPU-Z, you can track how well the GPU is being leveraged. Here, in the case of this convnet (no cuDNN), we max out at 76% GPU usage on average:
cuDNN v5 (Conditional)
If you're not going to train convnets then you might not really benefit from installing cuDNN. Per NVidia's website, "cuDNN provides highly tuned implementations for standard routines such as forward and backward convolution, pooling, normalization, and activation layers," hallmarks of convolution network architectures. Theano is mentioned in the list of frameworks that support cuDNN v5 for GPU acceleration.If you are going to train convnets, then download cuDNN from here. Choose the cuDNN Library for Windows10 dated May 12, 2016:
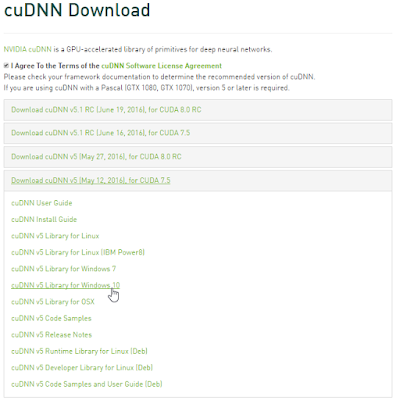
The downloaded ZIP file contains three directories (bin, include, lib). Extract those directories and copy the files they contain to the identically named folders in C:\toolkits\cuda-7.5.18.
To enable cuDNN, create a new sysenv variable named THEANO_FLAGS_GPU_DNN with the following value floatX=float32,device=gpu,optimizer_including=cudnn,lib.cnmem=0.8,dnn.conv.algo_bwd_filter=deterministic,dnn.conv.algo_bwd_data=deterministic,blas.ldflags=-LC:/toolkits/openblas-0.2.14-int32/bin -lopenblas
Then, run the following commands:
$ THEANO_FLAGS=$THEANO_FLAGS_GPU_DNN
$ cd /c/toolkits/keras-1.0.5/examples
$ python mnist_cnn.py
Note: If you get a cuDNN not available message after this, try cleaning your C:\Users\username\AppData\Local\Theano directory (replace username with your login name).
Here's the (cleaned up) execution log for the simple convnet Keras example, using cuDNN:
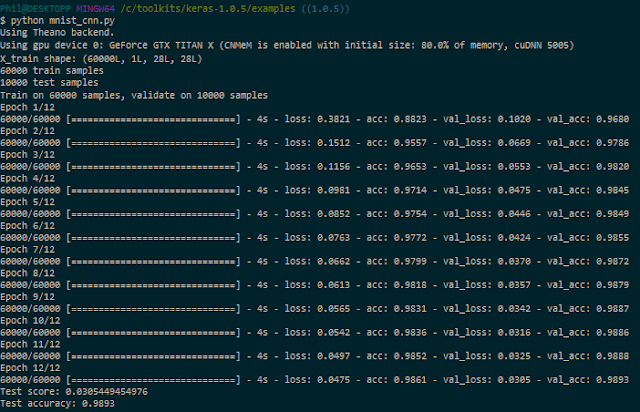
Now, each epoch takes about 4s, instead of 21s, a huge improvement in speed, with roughly the same GPU usage:
We're done!
Links
GitHub repoReferences
Setup a Deep Learning Environment on Windows (Theano & Keras with GPU Enabled), by Ayse Elvan AydemirInstallation of Theano on Windows, by Theano team
A few tips to install theano on Windows, 64 bits, by Kagglers
How do I install Keras and Theano in Anaconda Python 2.7 on Windows?, by S.O. contributors
Additional Thanks Go To...
Kaggler Vincent L. for recommending adding dnn.conv.algo_bwd_filter=deterministic,dnn.conv.algo_bwd_data=deterministic to THEANO_FLAGS_GPU_DNN in order to improve reproducibility with no observable impact on performance.If you'd rather use Python3, conda's built-in MinGW package, or pip, please refer to @stmax82 's note here.
Suggested viewing/reading
Intro to Deep Learning with Python, by Alec Radford@ https://www.youtube.com/watch?v=S75EdAcXHKk
@ http://slidesha.re/1zs9M11
@ https://github.com/Newmu/Theano-Tutorials
About the Author
For information about the author, please visit:

Hi Phil! First of all, thank you so much for so cool repo. I have followed all your steps and everything works well until the second execution of CNN with cuDNN. I have set the sysenv variable as told, but I get the following error:
ReplyDeleteRuntimeError: ('The following error happened while compiling the node', GpuDnnConv{algo='small', inplace=True}(GpuContiguous.0, GpuContiguous.0, GpuAllocEmpty.0, GpuDnnConvDesc{border_mode='valid', subsample=(1, 1), conv_mode='conv', precision='float32'}.0, Constant{1.0}, Constant{0.0}), '\n', 'could not create cuDNN handle: CUDNN_STATUS_INTERNAL_ERROR', "[GpuDnnConv{algo='small', inplace=True}(, , , , Constant{1.0}, Constant{0.0})]")
I have been trying some modifications to the sysenv variable and I have realized that if I change the "optimizer" parameter from default ("fast_run") to "None", the python code can be compiled an run properly, but really really slow. Could you please give me a hand on this?
Best regards,
I've also experienced errors when experimenting with flags. The only way for me to get back on track after those experiments was to clean my C:\Users\username\AppData\Local\Theano directory (replace username with your login name). Have you tried that? If that doesn't help, I'm not sure what's the best thing for you to do next.
DeleteHi Phil! Regardign the topic previously mentioned, I think I have finally managed to put some light on it. Maybe this helps to understand what could be hapening.
ReplyDeleteI have been doing a benchmark regarding the gpu-based execution of Theano (0.8.2) and Keras (1.0.5) on Windows 10. I am comparing the training time of a CNN over the MNIST dataset in 3 scenarios: CPU, GPU without cuDNN and GPU with CUDNN. CUDA v7.5 and cuDNN v5.0
First two approaches go well, but I have gone into troubles with the sysenv variables configuration for the GPU+cuDNN trial. My error source is the CNMeM configuration. If I run the same python code with CNMeM values from 0 (disbaled) up to 0.75, I have no problems. Moreover, I obtain a drop in the training time of more than 50% compared to the general GPU execution.
But I cannot go behind from 0.8. Wit 0.8, I receive the same compilation error.
RuntimeError: ('The following error happened while compiling the node', GpuDnnConv{algo='small', inplace=True}(GpuContiguous.0, GpuContiguous.0, GpuAllocEmpty.0, GpuDnnConvDesc{border_mode='valid', subsample=(1, 1), conv_mode='conv', precision='float32'}.0, Constant{1.0}, Constant{0.0}), '\n', 'could not create cuDNN handle: CUDNN_STATUS_INTERNAL_ERROR')
Best regards,
Good to know. This is a good reminder we need to be that much more mindful of the max value we choose for lib.cnmem when using the same card for display and DL. Thanks for sharing, Borja!
Delete