Back in July, we shared our deep learning Windows 10 setup for the Ultrasound Nerve Segmentation Kaggle competition. That setup relied on Keras1.0.5 + Theano0.8.2 + VS2013 + CUDA7.5 + cuDNN5.0, as explained here.
Now that the competition is over and that CUDA 8.0 has shipped, we are upgrading our DL setup to Keras1.1.0 + Theano0.8.2 + VS2015 + CUDA8.0 + cuDNN5.1.
Full gory details can be found here.
Comments welcome!
Wednesday, October 5, 2016
Tuesday, July 5, 2016
GPU-accelerated Theano & Keras on Windows 10 native
Why write about this?
There are certainly a lot of guides to assist you build great deep learning (DL) setups on Linux or Mac OS (including with Tensorflow which, unfortunately, as of this posting, cannot be easily installed on Windows), but few care about building an efficient Windows 10-native setup. Most focus on running an Ubuntu VM hosted on Windows or using Docker, unnecessary - and ultimately sub-optimal - steps.
We also found enough misguiding/deprecated information out there to make it worthwhile putting together a step-by-step guide for the latest stable versions of Theano and Keras. Used together, they make for one of the simplest and fastest DL configurations to work natively on Windows.
So, if you must run your DL setup on Windows 10, then the information contained here may be useful to you.
1. Visual Studio 2013 Community Edition Update 4
- Used for its C/C++ compiler (not its IDE)
2. CUDA 7.5.18 (64-bit)
- Used for its GPU math libraries, card driver, and CUDA compiler
3. MinGW-w64 (5.3.0)
- Used for its Unix-like compiler and build tools (g++/gcc, make...) for Windows
4. Anaconda (64-bit) w. Python 2.7 (Anaconda2-4.1.0)
- A Python distro that gives us NumPy, SciPy, and other scientific libraries
5. Theano 0.8.2
- Used to evaluate mathematical expressions on multi-dimensional arrays
6. Keras 1.0.5
- Used for deep learning on top of Theano
7. OpenBLAS 0.2.14 (Optional)
- Used for its CPU-optimized implementation of many linear algebra operations
8. cuDNN v5 (Conditional)
- Used to run vastly faster convolution neural networks
1. Dell Precision T7500, 96GB RAM
- Intel Xeon E5605 @ 2.13 GHz (2 processors, 8 cores total)
2. NVIDIA GeForce Titan X, 12GB RAM
- Driver version: 10.18.13.5390 Beta (ForceWare 353.90) / Win 10 64
So make sure to install VS 2013, if you haven't already. Then, add C:\Program Files (x86)\Microsoft Visual Studio 12.0\VC\bin to your PATH, based on where you installed VS 2013.
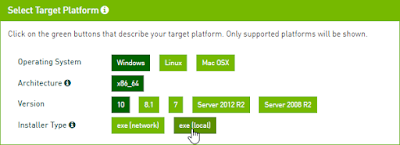
Select the proper target platform:
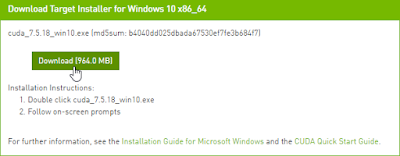
Download the installer:
Run the installer. In our case (a fluke?) the installer didn't allow us to choose where to install its files. It installed in C:\Program Files\NVIDIA GPU Computing Toolkit\CUDA\v7.5. Once it has done so, move the files from there to c:\toolkits\cuda-7.5.18 and update PATH as follows:
1. Define a system environment (sysenv) variable named CUDA_HOME with the value c:\toolkits\cuda-7.5.18
2. Add %CUDA_HOME%\libnwp and %CUDA_HOME%\bin to PATH

Install it to c:\toolkits\mingw-w64-5.3.0 with the following settings (second wizard screen):
1. Define sysenv variable MINGW_HOME with the value c:\toolkits\mingw-w64-5.3.0
2. Add %MINGW_HOME%\mingw64\bin to PATH
Run the following to make sure all necessary build tools can be found:
$ where gcc; where cl; where nvcc; where cudafe; where cudafe++
You should get results similar to:

Warning: Below, we enabled `Register Anaconda as the system Python 2.7` because it works for us, but that may not be the best option for you!
1. Define sysenv variable PYTHON_HOME with the value c:\toolkits\anaconda2-4.1.0
2. Add %PYTHON_HOME%, %PYTHON_HOME%\Scripts, and %PYTHON_HOME%\Library\bin to PATH
After anaconda installation open a MINGW64 command prompt and execute:
$ cd $PYTHON_HOME
$ conda install libpython
Clone a stable Theano release (0.8.2) to your local machine from GitHub using the following commands:
$ cd /c/toolkits
$ git clone https://github.com/Theano/Theano.git theano-0.8.2 --branch rel-0.8.2
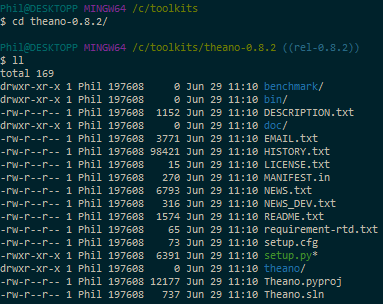
This should clone Theano 0.8.2 in c:\toolkits\theano-0.8.2:
Install it as follows:
$ cd /c/toolkits/theano-0.8.2
$ python setup.py install --record installed_files.txt
The list of files installed can be found here
Verify Theano was installed by querying Anaconda for the list of installed packages:
$ conda list | grep -i theano

According to the Theano documentation, the multi-threaded OpenBLAS library performs much better than the un-optimized standard BLAS (Basic Linear Algebra Subprograms) library, so that's what we use.
Download OpenBLAS from here and extract the files to c:\toolkits\openblas-0.2.14-int32
1. Define sysenv variable OPENBLAS_HOME with the value c:\toolkits\openblas-0.2.14-int32
2. Add %OPENBLAS_HOME%\bin to PATH
- sysenv variable THEANO_FLAGS_CPU with the value floatX=float32,device=cpu,lib.cnmem=0.8,blas.ldflags=-LC:/toolkits/openblas-0.2.14-int32/bin -lopenblas
- sysenv variable THEANO_FLAGS_GPU with the value floatX=float32,device=gpu,dnn.enabled=False,lib.cnmem=0.8,blas.ldflags=-LC:/toolkits/openblas-0.2.14-int32/bin -lopenblas
Theano only cares about the value of the sysenv variable named THEANO_FLAGS. All we need to do to tell Theano to use the CPU or GPU is to set THEANO_FLAGS to either THEANO_FLAGS_CPU or THEANO_FLAGS_GPU. You can verify those variables have been successfully added to your environment with the following command:
$ env | grep -i theano

Note: See the cuDNN section below for information about the THEANO_FLAGS_GPU_DNN flag
Save the code above to a file named openblas_test.py in the current directory (or download it from this GitHub repo and run the next commands:
$ THEANO_FLAGS=$THEANO_FLAGS_CPU
$ python openblas_test.py

Note: If you get a failure of the kind "NameError: global name 'CVM' is not defined", it may be because, like us, you've messed with the value of THEANO_FLAGS_CPU and switched back and forth between floatX=float32 and floatX=float64 several times. Cleaning your C:\Users\username\AppData\Local\Theano directory (replace username with your login name) will fix the problem (See here, for reference)
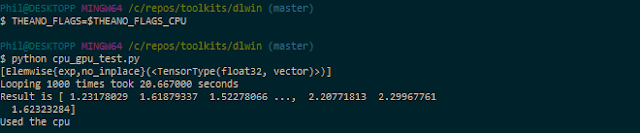
First, let's see what kind of results we get running Theano in CPU mode:
$ THEANO_FLAGS=$THEANO_FLAGS_CPU
$ python cpu_gpu_test.py
Next, let's run the same program on the GPU:
$ THEANO_FLAGS=$THEANO_FLAGS_GPU
$ python cpu_gpu_test.py

Almost a 26:1 improvement. It works! Great, we're done with setting up Theano 0.8.2.
$ cd /c/toolkits
$ git clone https://github.com/fchollet/keras.git keras-1.0.5 --branch 1.0.5
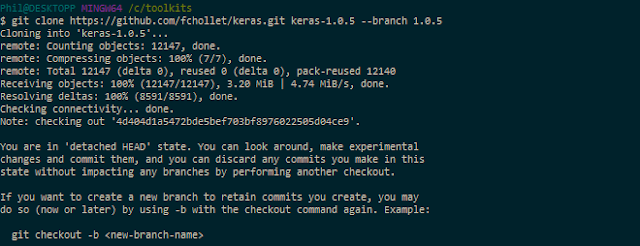
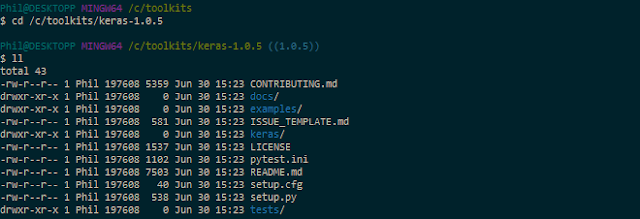
This should clone Keras 1.0.5 in c:\toolkits\keras-1.0.5:
Install it as follows:
$ cd /c/toolkits/keras-1.0.5
$ python setup.py install --record installed_files.txt
The list of files installed can be found here
Verify Keras was installed by querying Anaconda for the list of installed packages:
$ conda list | grep -i keras

$ cd /c/toolkits/keras-1.0.5/examples
$ python mnist_cnn.py
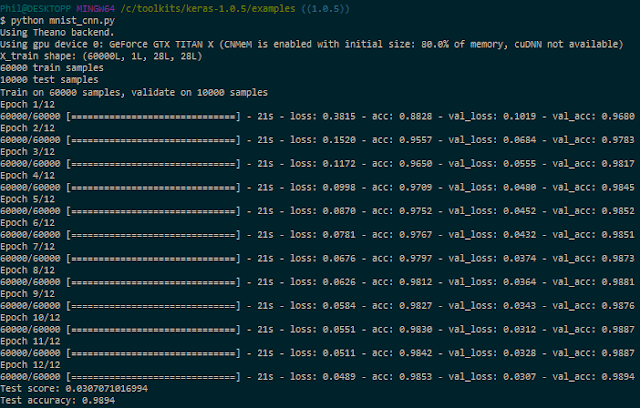
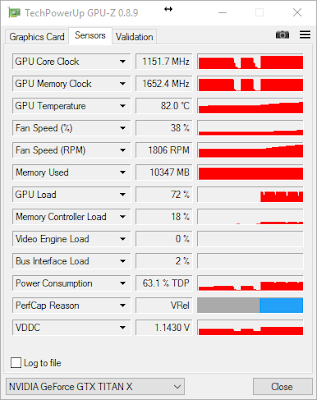
Without cuDNN, each epoch takes about 21s. If you install TechPowerUp's GPU-Z, you can track how well the GPU is being leveraged. Here, in the case of this convnet (no cuDNN), we max out at 76% GPU usage on average:

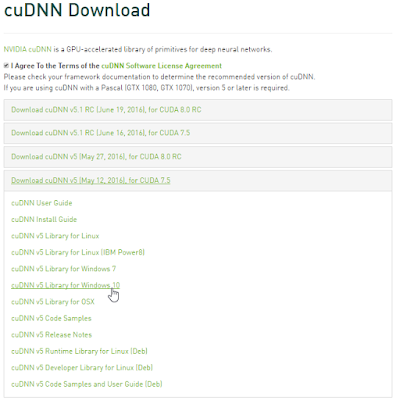
If you are going to train convnets, then download cuDNN from here. Choose the cuDNN Library for Windows10 dated May 12, 2016:
The downloaded ZIP file contains three directories (bin, include, lib). Extract those directories and copy the files they contain to the identically named folders in C:\toolkits\cuda-7.5.18.
To enable cuDNN, create a new sysenv variable named THEANO_FLAGS_GPU_DNN with the following value floatX=float32,device=gpu,optimizer_including=cudnn,lib.cnmem=0.8,dnn.conv.algo_bwd_filter=deterministic,dnn.conv.algo_bwd_data=deterministic,blas.ldflags=-LC:/toolkits/openblas-0.2.14-int32/bin -lopenblas
Then, run the following commands:
$ THEANO_FLAGS=$THEANO_FLAGS_GPU_DNN
$ cd /c/toolkits/keras-1.0.5/examples
$ python mnist_cnn.py
Note: If you get a cuDNN not available message after this, try cleaning your C:\Users\username\AppData\Local\Theano directory (replace username with your login name).
Here's the (cleaned up) execution log for the simple convnet Keras example, using cuDNN:
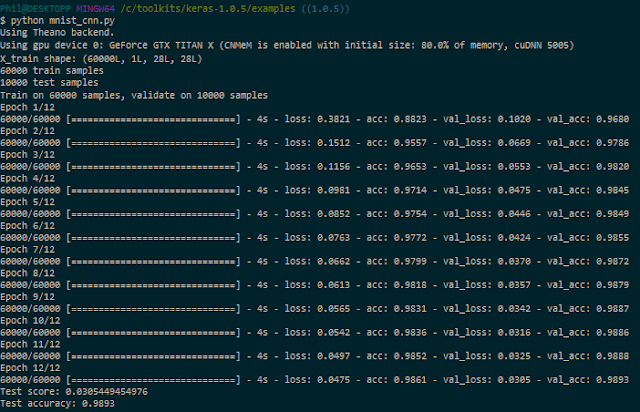
Now, each epoch takes about 4s, instead of 21s, a huge improvement in speed, with roughly the same GPU usage:
We're done!
Installation of Theano on Windows, by Theano team
A few tips to install theano on Windows, 64 bits, by Kagglers
How do I install Keras and Theano in Anaconda Python 2.7 on Windows?, by S.O. contributors
If you'd rather use Python3, conda's built-in MinGW package, or pip, please refer to @stmax82 's note here.
@ https://www.youtube.com/watch?v=S75EdAcXHKk
@ http://slidesha.re/1zs9M11
@ https://github.com/Newmu/Theano-Tutorials
For information about the author, please visit:

There are certainly a lot of guides to assist you build great deep learning (DL) setups on Linux or Mac OS (including with Tensorflow which, unfortunately, as of this posting, cannot be easily installed on Windows), but few care about building an efficient Windows 10-native setup. Most focus on running an Ubuntu VM hosted on Windows or using Docker, unnecessary - and ultimately sub-optimal - steps.
We also found enough misguiding/deprecated information out there to make it worthwhile putting together a step-by-step guide for the latest stable versions of Theano and Keras. Used together, they make for one of the simplest and fastest DL configurations to work natively on Windows.
So, if you must run your DL setup on Windows 10, then the information contained here may be useful to you.
Dependencies
Here's a list of the tools and libraries we use for deep learning on Windows 10:1. Visual Studio 2013 Community Edition Update 4
- Used for its C/C++ compiler (not its IDE)
2. CUDA 7.5.18 (64-bit)
- Used for its GPU math libraries, card driver, and CUDA compiler
3. MinGW-w64 (5.3.0)
- Used for its Unix-like compiler and build tools (g++/gcc, make...) for Windows
4. Anaconda (64-bit) w. Python 2.7 (Anaconda2-4.1.0)
- A Python distro that gives us NumPy, SciPy, and other scientific libraries
5. Theano 0.8.2
- Used to evaluate mathematical expressions on multi-dimensional arrays
6. Keras 1.0.5
- Used for deep learning on top of Theano
7. OpenBLAS 0.2.14 (Optional)
- Used for its CPU-optimized implementation of many linear algebra operations
8. cuDNN v5 (Conditional)
- Used to run vastly faster convolution neural networks
Hardware
This is our hardware config:1. Dell Precision T7500, 96GB RAM
- Intel Xeon E5605 @ 2.13 GHz (2 processors, 8 cores total)
2. NVIDIA GeForce Titan X, 12GB RAM
- Driver version: 10.18.13.5390 Beta (ForceWare 353.90) / Win 10 64
Installation steps
We like to keep our toolkits and libraries in a single root folder boringly called c:\toolkits, so whenever you see a Windows path that starts with c:\toolkits below, make sure to replace it with whatever you decide your own toolkit drive and folder ought to be.Visual Studio 2013 Community Edition Update 4
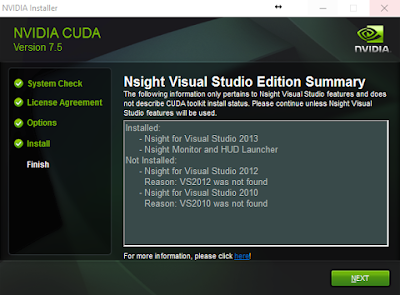
You can download Visual Studio 2013 Community Edition from here. Yes, we're aware there's a Visual Studio 2015 Community Edition, and it is also installed on our system, BUT the CUDA toolkit won't even attempt to use it, as shown below:
So make sure to install VS 2013, if you haven't already. Then, add C:\Program Files (x86)\Microsoft Visual Studio 12.0\VC\bin to your PATH, based on where you installed VS 2013.
CUDA 7.5.18 (64-bit)
Download CUDA 7.5 (64-bit) from the NVidia website.Select the proper target platform:

Download the installer:

Run the installer. In our case (a fluke?) the installer didn't allow us to choose where to install its files. It installed in C:\Program Files\NVIDIA GPU Computing Toolkit\CUDA\v7.5. Once it has done so, move the files from there to c:\toolkits\cuda-7.5.18 and update PATH as follows:
1. Define a system environment (sysenv) variable named CUDA_HOME with the value c:\toolkits\cuda-7.5.18
2. Add %CUDA_HOME%\libnwp and %CUDA_HOME%\bin to PATH
MinGW-w64 (5.3.0)
Download MinGW-w64 from here:
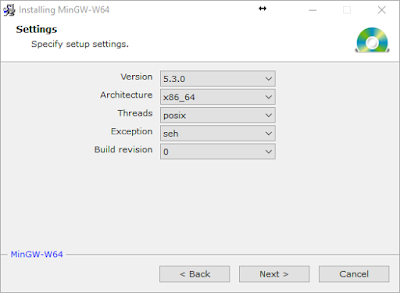
Install it to c:\toolkits\mingw-w64-5.3.0 with the following settings (second wizard screen):

1. Define sysenv variable MINGW_HOME with the value c:\toolkits\mingw-w64-5.3.0
2. Add %MINGW_HOME%\mingw64\bin to PATH
Run the following to make sure all necessary build tools can be found:
$ where gcc; where cl; where nvcc; where cudafe; where cudafe++
You should get results similar to:

Anaconda (64-bit) w. Python 2.7 (Anaconda2-4.1.0)
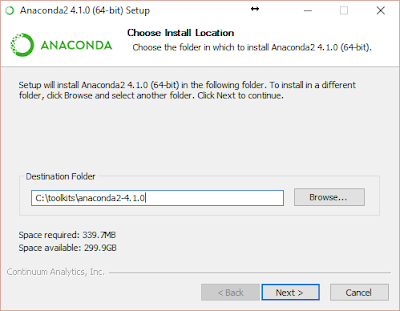
Download Anaconda from here and install it to `c:\toolkits\anaconda2-4.1.0`:
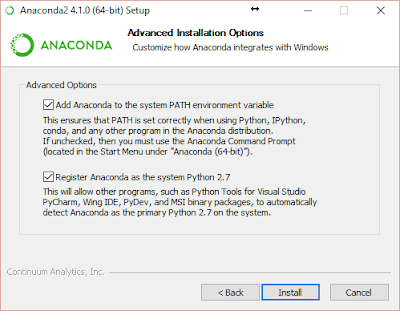
Warning: Below, we enabled `Register Anaconda as the system Python 2.7` because it works for us, but that may not be the best option for you!

1. Define sysenv variable PYTHON_HOME with the value c:\toolkits\anaconda2-4.1.0
2. Add %PYTHON_HOME%, %PYTHON_HOME%\Scripts, and %PYTHON_HOME%\Library\bin to PATH
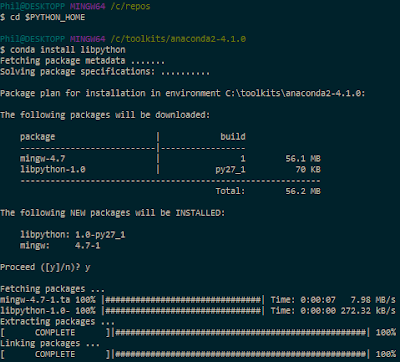
After anaconda installation open a MINGW64 command prompt and execute:
$ cd $PYTHON_HOME
$ conda install libpython

Theano 0.8.2
Version 0.8.2? Why not just install the latest bleeding-edge version of Theano since it obviously must work better, right? Simply put, because it makes reproducible research harder. If your work colleagues or Kaggle teammates install the latest code from the dev branch at a different time than you did, you will most likely be running different code bases on your machines, increasing the odds that even though you're using the same input data (the same random seeds, etc.), you still end up with different results when you shouldn't. For this reason alone, we highly recommend only using point releases, the same one across machines, and always documenting which one you use if you can't just use a setup script.Clone a stable Theano release (0.8.2) to your local machine from GitHub using the following commands:
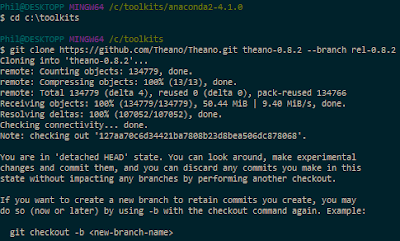
$ cd /c/toolkits
$ git clone https://github.com/Theano/Theano.git theano-0.8.2 --branch rel-0.8.2

This should clone Theano 0.8.2 in c:\toolkits\theano-0.8.2:

Install it as follows:
$ cd /c/toolkits/theano-0.8.2
$ python setup.py install --record installed_files.txt
The list of files installed can be found here
Verify Theano was installed by querying Anaconda for the list of installed packages:
$ conda list | grep -i theano
OpenBLAS 0.2.14 (Optional)
If we're going to use the GPU, why install a CPU-optimized linear algebra library? With our setup, most of the deep learning grunt work is performed by the GPU, that is correct, but the CPU isn't idle. An important part of image-based DL is data augmentation. In that context, data augmentation is the process of manufacturing additional input samples (more training images) by transformation of the original training samples, via the use of image processing operators. Basic transformations such as downsampling and (mean-centered) normalization are also needed. If you feel adventurous, you'll want to try additional pre-processing enhancements (noise removal, histogram equalization, etc.). You certainly could use the GPU for that purpose and save the results to file. In practice, however, those operations are often executed in parallel on the CPU while the GPU is busy learning the weights of the deep neural network and the augmented data discarded after use. For this reason, we highly recommend installing the OpenBLAS library.According to the Theano documentation, the multi-threaded OpenBLAS library performs much better than the un-optimized standard BLAS (Basic Linear Algebra Subprograms) library, so that's what we use.
Download OpenBLAS from here and extract the files to c:\toolkits\openblas-0.2.14-int32
1. Define sysenv variable OPENBLAS_HOME with the value c:\toolkits\openblas-0.2.14-int32
2. Add %OPENBLAS_HOME%\bin to PATH
Switching between CPU and GPU mode
Next, create the two following sysenv variables:- sysenv variable THEANO_FLAGS_CPU with the value floatX=float32,device=cpu,lib.cnmem=0.8,blas.ldflags=-LC:/toolkits/openblas-0.2.14-int32/bin -lopenblas
- sysenv variable THEANO_FLAGS_GPU with the value floatX=float32,device=gpu,dnn.enabled=False,lib.cnmem=0.8,blas.ldflags=-LC:/toolkits/openblas-0.2.14-int32/bin -lopenblas
Theano only cares about the value of the sysenv variable named THEANO_FLAGS. All we need to do to tell Theano to use the CPU or GPU is to set THEANO_FLAGS to either THEANO_FLAGS_CPU or THEANO_FLAGS_GPU. You can verify those variables have been successfully added to your environment with the following command:
$ env | grep -i theano

Note: See the cuDNN section below for information about the THEANO_FLAGS_GPU_DNN flag
Validating our OpenBLAS install (Optional)
We can use the following program from the Theano documentation:import numpy as np import time import theano print('blas.ldflags=', theano.config.blas.ldflags) A = np.random.rand(1000, 10000).astype(theano.config.floatX) B = np.random.rand(10000, 1000).astype(theano.config.floatX) np_start = time.time() AB = A.dot(B) np_end = time.time() X, Y = theano.tensor.matrices('XY') mf = theano.function([X, Y], X.dot(Y)) t_start = time.time() tAB = mf(A, B) t_end = time.time() print("numpy time: %f[s], theano time: %f[s] (times should be close when run on CPU!)" % ( np_end - np_start, t_end - t_start)) print("Result difference: %f" % (np.abs(AB - tAB).max(), ))
Save the code above to a file named openblas_test.py in the current directory (or download it from this GitHub repo and run the next commands:
$ THEANO_FLAGS=$THEANO_FLAGS_CPU
$ python openblas_test.py

Note: If you get a failure of the kind "NameError: global name 'CVM' is not defined", it may be because, like us, you've messed with the value of THEANO_FLAGS_CPU and switched back and forth between floatX=float32 and floatX=float64 several times. Cleaning your C:\Users\username\AppData\Local\Theano directory (replace username with your login name) will fix the problem (See here, for reference)
Validating our GPU install with Theano
We'll run the following program from the Theano documentation to compare the performance of the GPU install vs using Thenao in CPU-mode. Save the code to a file named cpu_gpu_test.py in the current directory (or download it from this GitHub repo):from theano import function, config, shared, sandbox import theano.tensor as T import numpy import time vlen = 10 * 30 * 768 # 10 x #cores x # threads per core iters = 1000 rng = numpy.random.RandomState(22) x = shared(numpy.asarray(rng.rand(vlen), config.floatX)) f = function([], T.exp(x)) print(f.maker.fgraph.toposort()) t0 = time.time() for i in range(iters): r = f() t1 = time.time() print("Looping %d times took %f seconds" % (iters, t1 - t0)) print("Result is %s" % (r,)) if numpy.any([isinstance(x.op, T.Elemwise) for x in f.maker.fgraph.toposort()]): print('Used the cpu') else: print('Used the gpu')
First, let's see what kind of results we get running Theano in CPU mode:
$ THEANO_FLAGS=$THEANO_FLAGS_CPU
$ python cpu_gpu_test.py

Next, let's run the same program on the GPU:
$ THEANO_FLAGS=$THEANO_FLAGS_GPU
$ python cpu_gpu_test.py

Almost a 26:1 improvement. It works! Great, we're done with setting up Theano 0.8.2.
Keras 1.0.5
Clone a stable Keras release (1.0.5) to your local machine from GitHub using the following commands:$ cd /c/toolkits
$ git clone https://github.com/fchollet/keras.git keras-1.0.5 --branch 1.0.5

This should clone Keras 1.0.5 in c:\toolkits\keras-1.0.5:

Install it as follows:
$ cd /c/toolkits/keras-1.0.5
$ python setup.py install --record installed_files.txt
The list of files installed can be found here
Verify Keras was installed by querying Anaconda for the list of installed packages:
$ conda list | grep -i keras
Validating our GPU install with Keras
We can train a simple convnet (convolutional neural network) on the MNIST dataset by using one of the example scripts provided with Keras. The file is called mnist_cnn.py and can be found in the examples folder:$ cd /c/toolkits/keras-1.0.5/examples
$ python mnist_cnn.py

Without cuDNN, each epoch takes about 21s. If you install TechPowerUp's GPU-Z, you can track how well the GPU is being leveraged. Here, in the case of this convnet (no cuDNN), we max out at 76% GPU usage on average:

cuDNN v5 (Conditional)
If you're not going to train convnets then you might not really benefit from installing cuDNN. Per NVidia's website, "cuDNN provides highly tuned implementations for standard routines such as forward and backward convolution, pooling, normalization, and activation layers," hallmarks of convolution network architectures. Theano is mentioned in the list of frameworks that support cuDNN v5 for GPU acceleration.If you are going to train convnets, then download cuDNN from here. Choose the cuDNN Library for Windows10 dated May 12, 2016:

The downloaded ZIP file contains three directories (bin, include, lib). Extract those directories and copy the files they contain to the identically named folders in C:\toolkits\cuda-7.5.18.
To enable cuDNN, create a new sysenv variable named THEANO_FLAGS_GPU_DNN with the following value floatX=float32,device=gpu,optimizer_including=cudnn,lib.cnmem=0.8,dnn.conv.algo_bwd_filter=deterministic,dnn.conv.algo_bwd_data=deterministic,blas.ldflags=-LC:/toolkits/openblas-0.2.14-int32/bin -lopenblas
Then, run the following commands:
$ THEANO_FLAGS=$THEANO_FLAGS_GPU_DNN
$ cd /c/toolkits/keras-1.0.5/examples
$ python mnist_cnn.py
Note: If you get a cuDNN not available message after this, try cleaning your C:\Users\username\AppData\Local\Theano directory (replace username with your login name).
Here's the (cleaned up) execution log for the simple convnet Keras example, using cuDNN:

Now, each epoch takes about 4s, instead of 21s, a huge improvement in speed, with roughly the same GPU usage:

We're done!
Links
GitHub repoReferences
Setup a Deep Learning Environment on Windows (Theano & Keras with GPU Enabled), by Ayse Elvan AydemirInstallation of Theano on Windows, by Theano team
A few tips to install theano on Windows, 64 bits, by Kagglers
How do I install Keras and Theano in Anaconda Python 2.7 on Windows?, by S.O. contributors
Additional Thanks Go To...
Kaggler Vincent L. for recommending adding dnn.conv.algo_bwd_filter=deterministic,dnn.conv.algo_bwd_data=deterministic to THEANO_FLAGS_GPU_DNN in order to improve reproducibility with no observable impact on performance.If you'd rather use Python3, conda's built-in MinGW package, or pip, please refer to @stmax82 's note here.
Suggested viewing/reading
Intro to Deep Learning with Python, by Alec Radford@ https://www.youtube.com/watch?v=S75EdAcXHKk
@ http://slidesha.re/1zs9M11
@ https://github.com/Newmu/Theano-Tutorials
About the Author
For information about the author, please visit:
Monday, June 20, 2016
Sentiment Analysis and Topic Detection in R using Microsoft Cognitive Services
In our previous post, we covered {mscsweblm4r}, a R package available on CRAN that wraps the Microsoft Cognitive Services Web Language Model REST API. In today's post, we'll go over {mscstexta4r}, a new R package that gives us access to another silo of Microsoft's NLP technology, its Text Analytics API.
Sentiment analysis is often applied to product and business reviews (Amazon, Yelp, TripAdvisor, etc.) for marketing/customer service purposes. It is also increasingly used in fintech for stock prediction using Twitter opinion mining, general stock market behavior prediction, etc.
Topic detection/mining can certainly help identify predominant themes across vast quantities of reviews but it can also be used to detect and index similar documents in large corpora, or cluster documents by their inferred topic.
You can install the latest stable version of {mscstexta4r} from CRAN as follows:
After following the Reference Manual instructions regarding API key configuration, you'll be able to use the package with:
It doesn't get any simpler than this. The results are conveniently formatted as a dataframe, as with all the other {mscstexta4r} functions. We've already covered in detail why it is important to use tryCatch() in our previous post, so we won't go over it again, except to remind you that HTTP requests over a network and the Internet can fail. tryCatch(), in our opinion, offers the best mechanism to handle those failures.
If you need to operate the same R console while topic detection is being performed by the Microsoft Cognitive services servers, you should call textaDetectTopics() in asynchronous mode and then call textaDetectTopicsStatus() periodically yourself, until the Microsoft Cognitive Services server complete topic detection and results become available.
For additional details -- and plenty of sample code! -- please take a look at the Vignette included with the package or review the README in the package's GitHub repo.
This applies to sentiment analysis, language detection, and key talking points extraction, for which we get results almost immediately on a small number of short documents. With topic detection, the API requires a minimum of 100 documents. In our experience, topic detection often took between 7 and 9 minutes on batches of 100 typical Yelp-size reviews (if there is such a thing).
If you'd like to get a feel for the speed of execution of the {mscstexta4r} package without having to write any code for it, you may want to try MSCSShiny, the web app we created to test/demo our packages. You can try it live on shinyapps.io, or download it from GitHub. Note that if the web app on shinyapps.io doesn't show up, its monthly max usage for the free tier has already been exceeded. If the app shows up but doesn't give you results, it is because there are either too many people trying to use it at the same time, or the Microsoft Cognitive Services rate limiters have kicked in. For a fair assessment, I highly recommend that you install the web app from GitHub, set it up to use your personal API key, and run it on your own machine inside the wonderful RStudio.
Have fun!
MSCSShiny on shinyapps.io, on GitHub
All Microsoft Cognitive Services components are Copyright (c) Microsoft.
What does {mscstexta4r} do?
Per Microsoft's website, the Microsoft Cognitive Services Text Analytics REST API is a suite of text analytics web services built with Azure Machine Learning to analyze unstructured text. By exposing R bindings for this API, {mscstexta4r} allows the following operations:- Sentiment analysis - Is a sentence or document generally positive or negative?
- Topic detection - What's being discussed across a list of documents/reviews/articles?
- Language detection - What language is a document written in?
- Key talking points extraction - What's being discussed in a single document?
Sentiment analysis
The API returns a numeric score between 0 and 1. Scores close to 1 indicate positive sentiment and scores close to 0 indicate negative sentiment. Sentiment score is generated using classification techniques. The input features of the classifier include n-grams, features generated from part-of-speech tags, and word embeddings. English, French, Spanish and Portuguese text are supported.Sentiment analysis is often applied to product and business reviews (Amazon, Yelp, TripAdvisor, etc.) for marketing/customer service purposes. It is also increasingly used in fintech for stock prediction using Twitter opinion mining, general stock market behavior prediction, etc.
Topic detection
This API returns the detected topics for a list of submitted text records. A topic is identified with a key phrase, which can be one or more related words. This API requires a minimum of 100 text records to be submitted, but is designed to detect topics across hundreds to thousands of records. The API is designed to work well for short, human-written text such as reviews and user feedback. English is the only language supported at this time.Topic detection/mining can certainly help identify predominant themes across vast quantities of reviews but it can also be used to detect and index similar documents in large corpora, or cluster documents by their inferred topic.
Language detection
This API returns the detected language and a numeric score between 0 and 1. Scores close to 1 indicate 100% certainty that the identified language is correct. A total of 120 languages are supported.Extraction of key talking points
This API returns a list of strings denoting the key talking points in the input text. English, German, Spanish, and Japanese text are supported.How do I install this package?
First things first: before you can use the {mscstexta4r} R package, you will need to have a valid account with Microsoft Cognitive Services. Once you have an account, Microsoft will provide you with a (free) API key listed under your subscriptions. After you've configured {mscstexta4r} with your API key, as explained in the Reference Manual on CRAN, you will be able to call the Text Analytics REST API from R, up to your maximum number of transactions per month and per minute -- again, for free.You can install the latest stable version of {mscstexta4r} from CRAN as follows:
install.packages("mscstexta4r")
After following the Reference Manual instructions regarding API key configuration, you'll be able to use the package with:
library(mscstexta4r)
textaInit()
How do I use {mscstexta4r}?
With this package, as with {mscsweblm4r}, we've tried to hide as much of the complexity associated with RESTful API HTTP calls as possible. The following example demonstrates how trivial it is to use the sentiment analysis API from R:docsText <- c( "Loved the food, service and atmosphere! We'll definitely be back.", "Very good food, reasonable prices, excellent service.", "It was a great restaurant.", "If steak is what you want, this is the place.", "The atmosphere is pretty bad but the food is quite good.", "The food is quite good but the atmosphere is pretty bad.", "The food wasn't very good.", "I'm not sure I would come back to this restaurant.", "While the food was good the service was a disappointment.", "I was very disappointed with both the service and my entree." ) docsLanguage <- rep("en", length(docsText)) tryCatch({ # Perform sentiment analysis textaSentiment( documents = docsText, # Input sentences or documents languages = docsLanguage # "en"(English, default)|"es"(Spanish)|"fr"(French)|"pt"(Portuguese) ) }, error = function(err) { # Print error geterrmessage() }) #> texta [https://westus.api.cognitive.microsoft.com/text/analytics/v2.0/sentiment] #> #> -------------------------------------- #> text score #> ------------------------------ ------- #> Loved the food, service and 0.9847 #> atmosphere! We'll definitely #> be back. #> #> Very good food, reasonable 0.9831 #> prices, excellent service. #> #> It was a great restaurant. 0.9306 #> #> If steak is what you want, 0.8014 #> this is the place. #> #> The atmosphere is pretty bad 0.4998 #> but the food is quite good. #> #> The food is quite good but the 0.475 #> atmosphere is pretty bad. #> #> The food wasn't very good. 0.1877 #> #> I'm not sure I would come back 0.2857 #> to this restaurant. #> #> While the food was good the 0.08727 #> service was a disappointment. #> #> I was very disappointed with 0.01877 #> both the service and my #> entree. #> --------------------------------------
It doesn't get any simpler than this. The results are conveniently formatted as a dataframe, as with all the other {mscstexta4r} functions. We've already covered in detail why it is important to use tryCatch() in our previous post, so we won't go over it again, except to remind you that HTTP requests over a network and the Internet can fail. tryCatch(), in our opinion, offers the best mechanism to handle those failures.
Synchronous vs asynchronous execution
All but one core text analytics functions execute exclusively in synchronous mode. textaDetectTopics() is the only function that can be executed either synchronously or asynchronously. Why? Because topic detection is typically a "batch" operation meant to be performed on thousands of related documents (product reviews, research articles, etc.).What's the difference?
When textaDetectTopics() executes synchronously, you must wait for it to finish before you can move on to the next task. When textaDetectTopics() executes asynchronously, you can move on to something else before topic detection has completed.When to run which mode
If you're performing topic detection in batch mode (from an R script), we recommend using the textaDetectTopics() in synchronous mode, in which case, again, it will return only after topic detection has completed.If you need to operate the same R console while topic detection is being performed by the Microsoft Cognitive services servers, you should call textaDetectTopics() in asynchronous mode and then call textaDetectTopicsStatus() periodically yourself, until the Microsoft Cognitive Services server complete topic detection and results become available.
For additional details -- and plenty of sample code! -- please take a look at the Vignette included with the package or review the README in the package's GitHub repo.
How fast is {mscstexta4r}?
The answer to that question depends on many factors, including the kind of Internet service provider you are using. In our case, with this package and {mscsweblm4r}, we've been very impressed by the low latency of most HTTP calls, despite our less-than-stellar ISP.This applies to sentiment analysis, language detection, and key talking points extraction, for which we get results almost immediately on a small number of short documents. With topic detection, the API requires a minimum of 100 documents. In our experience, topic detection often took between 7 and 9 minutes on batches of 100 typical Yelp-size reviews (if there is such a thing).
If you'd like to get a feel for the speed of execution of the {mscstexta4r} package without having to write any code for it, you may want to try MSCSShiny, the web app we created to test/demo our packages. You can try it live on shinyapps.io, or download it from GitHub. Note that if the web app on shinyapps.io doesn't show up, its monthly max usage for the free tier has already been exceeded. If the app shows up but doesn't give you results, it is because there are either too many people trying to use it at the same time, or the Microsoft Cognitive Services rate limiters have kicked in. For a fair assessment, I highly recommend that you install the web app from GitHub, set it up to use your personal API key, and run it on your own machine inside the wonderful RStudio.
Have fun!
Links
{mscstexta4r} on CRAN, on GitHubMSCSShiny on shinyapps.io, on GitHub
All Microsoft Cognitive Services components are Copyright (c) Microsoft.
Tuesday, May 24, 2016
Using the Microsoft Cognitive Services Web Language Model REST API from R
Microsoft Cognitive Services -- formerly known as Project Oxford -- are a set of APIs, SDKs and services that developers can use to add AI features to their applications. Those features include emotion and video detection; facial, speech and vision recognition; and speech and language understanding.
The Microsoft Cognitive Services website provides several code samples that illustrate how to use their APIs from C#, Java, JavaScript, ObjC, PHP, Python, Ruby, and... you guessed it -- if you want to test drive their service from R, you're pretty much on your own.
To experiment with Microsoft's NLP technology in R, we've developed R bindings for a subset of their work, the Web Language Model API.
Per Microsoft's website, this API uses smoothed Backoff N-gram language models (supporting Markov order up to 5) that were trained on four web-scale American English corpora collected by Bing (web page body, title, anchor and query).
The MSCS Web Language Model REST API supports four lookup operations:
To use the {mscsweblm4r} package, you **MUST** have a valid account with Microsoft Cognitive Services. Once you have an account, Microsoft will provide you with a (free) API key. The key will be listed under your subscriptions.
At the time of this writing, we're allowed 100,000 transactions per month, 1,000 per minute, more than enough for us to evaluate the technology -- for free...
After you've configured {mscsweblm4r} with your API key (see the Reference manual on CRAN for details), you will be able to call the Web Language Model REST API from R, up to your maximum number of transactions per month and per minute.
How hard is it to use?
{mscsweblm4r} tries to make it as simple as possible. Like most other published packages, you can install it from CRAN with:
After you've followed the Reference Manual instructions regarding API key configuration, you'll be ready to use the package with:
Here's a trivial example that allows you to get the list of word candidates most likely to follow a very common sentence beginning -- "how are you"
No surprise there -- "how are you doing" is a common expression, indeed. What's with the negative probability, though? In the world of N-gram probabilistic language models, using log10(probabilities) is a common strategy to avoid numeric underflows when multiplying very small numbers (n-gram probabilities) together -- see page 22 of Dan Jurafsky's PDF on N-gram Language Models, here.
What matters more, here, is that weblmGenerateNextWords()'s results are conveniently formatted as a data.frame, as is the case for all {mscsweblm4r} core functions.
The API call can also fail if you've exhausted your call volume quota or are exceeding the API calls rate limit. Unfortunately, Microsoft Cognitive Services does not expose an API you can query to check if you're about to exceed your quota, for instance. The only way you'll know is by looking at the error code returned after an API call has failed.
Therefore, you must write your R code with failure in mind. And for that, our preferred way is to use tryCatch(). Its mechanism may appear a bit daunting at first, but it is well documented.
We've also included many examples in the Reference manual that illustrate how to use it with other {mscsweblm4r} functions.
Yes, this is purely anecdotal, and your experience may turn out differently from ours. What we're hoping, though, is that some of you will be interested in using our package as a building block for your own evaluation framework. If you do, please share your results with us. We will gladly make room for them on the package's GitHub page for the NLP community at large to review.
After our free shinyapps.io credits for this app expire, if you still want to try the web application, you'll be able to download the code from GitHub and run it locally, or push it to your favorite publishing platform. In all cases, you will have to configure it to use your own Web LM API key.
Enjoy!
{mscsweblm4r} on GitHub
MSCSShiny on GitHub
MSCSShiny on shinyapps.io
All Microsoft Cognitive Services components are Copyright © Microsoft.
To experiment with Microsoft's NLP technology in R, we've developed R bindings for a subset of their work, the Web Language Model API.
What is {mscsweblm4r}?
{mscsweblm4r} is a R package, downloadable from CRAN, that simply wraps the Microsoft Cognitive Services Web Language Model REST API,Per Microsoft's website, this API uses smoothed Backoff N-gram language models (supporting Markov order up to 5) that were trained on four web-scale American English corpora collected by Bing (web page body, title, anchor and query).
The MSCS Web Language Model REST API supports four lookup operations:
- Calculate the joint probability that a sequence of words will appear together.
- Compute the conditional probability that a specific word will follow an existing sequence of words.
- Get the list of words (completions) most likely to follow a given sequence of words.
- Insert spaces into a string of words adjoined together without any spaces (hashtags, URLs, etc.).
How do I get started?
At the time of this writing, we're allowed 100,000 transactions per month, 1,000 per minute, more than enough for us to evaluate the technology -- for free...
After you've configured {mscsweblm4r} with your API key (see the Reference manual on CRAN for details), you will be able to call the Web Language Model REST API from R, up to your maximum number of transactions per month and per minute.
How hard is it to use?
{mscsweblm4r} tries to make it as simple as possible. Like most other published packages, you can install it from CRAN with:
install.packages("mscsweblm4r")
After you've followed the Reference Manual instructions regarding API key configuration, you'll be ready to use the package with:
library(mscsweblm4r)
weblmInit()
Here's a trivial example that allows you to get the list of word candidates most likely to follow a very common sentence beginning -- "how are you"
tryCatch({

  # Generate next words
  weblmGenerateNextWords(
    precedingWords = "how are you",  # ASCII only
    modelToUse = "title",            # "title"|"anchor"|"query"(default)|"body"
    orderOfNgram = 4L,               # 1L|2L|3L|4L|5L(default)
    maxNumOfCandidatesReturned = 5L  # Default: 5L
  )

}, error = function(err) {

  # Print error
  geterrmessage()

})
#> weblm [https://api.projectoxford.ai/text/weblm/v1.0/generateNextWords?model=title&words=how%20are%20you&order=4&maxNumOfCandidatesReturned=5]
#>
#> ---------------------
#>  word    probability
#> ------- -------------
#>  doing     -1.105
#>
#>   in       -1.239
#>
#> feeling    -1.249
#>
#>  going     -1.378
#>
#>  today      -1.43
#> ---------------------
No surprise there -- "how are you doing" is a common expression, indeed. What's with the negative probability, though? In the world of N-gram probabilistic language models, using log10(probabilities) is a common strategy to avoid numeric underflows when multiplying very small numbers (n-gram probabilities) together -- see page 22 of Dan Jurafsky's PDF on N-gram Language Models, here.
What matters more, here, is that weblmGenerateNextWords()'s results are conveniently formatted as a data.frame, as is the case for all {mscsweblm4r} core functions.
Why do I need to use tryCatch()?
The Web Language Model API is a RESTful API. HTTP requests over a network and the Internet can fail. Because of congestion, because the web site might be down for maintenance, because you decided to enjoy your cup of Starbucks coffee and work in the courtyard and your wireless connection suddenly dropped, etc. There are many possible points of failure.The API call can also fail if you've exhausted your call volume quota or are exceeding the API calls rate limit. Unfortunately, Microsoft Cognitive Services does not expose an API you can query to check if you're about to exceed your quota, for instance. The only way you'll know is by looking at the error code returned after an API call has failed.
Therefore, you must write your R code with failure in mind. And for that, our preferred way is to use tryCatch(). Its mechanism may appear a bit daunting at first, but it is well documented.
We've also included many examples in the Reference manual that illustrate how to use it with other {mscsweblm4r} functions.
How fast is {mscsweblm4r}?
The internet service provider we use (and that shall rename nameless) isn't exactly known for its performance, to say the least. Despite this, we've often been floored by how low the latency was for most HTTP requests.Yes, this is purely anecdotal, and your experience may turn out differently from ours. What we're hoping, though, is that some of you will be interested in using our package as a building block for your own evaluation framework. If you do, please share your results with us. We will gladly make room for them on the package's GitHub page for the NLP community at large to review.
Can I try a live demo?
Sure, you can. To validate our package, we developed a Shiny web app called MSCSShiny. The source code is available here. We've also published the application to shinyapps.io.After our free shinyapps.io credits for this app expire, if you still want to try the web application, you'll be able to download the code from GitHub and run it locally, or push it to your favorite publishing platform. In all cases, you will have to configure it to use your own Web LM API key.
Enjoy!
Links
{mscsweblm4r} on CRAN{mscsweblm4r} on GitHub
MSCSShiny on GitHub
MSCSShiny on shinyapps.io
All Microsoft Cognitive Services components are Copyright © Microsoft.
Subscribe to:
Posts (Atom)